The first thing you want to do is open up Powerpoint. Yes, the program for presentations. If you don't have Powerpoint on your computer, you can get a free one month trial here.
Using the text tool type out your text.
Now click on toolbox so you get the formatting window (you must have your word selected to get the tool box to open). About half way down you'll see 'Quick Styles and Effects." Click on that..and then click on the 'abc' tab. (I hope I didn't lose you!)
You can now close out Powerpoint.
At this point you want to open up Silhouette Studio. Now using your computer's search function look for 'Slide 1' or Word Art (and then open the folder to Word Art to view Slide 1"). Just like you would with any jpeg, drag and drop the jpeg image of your word art into Silhouette Studio. If you need a refresher for bringing jpegs into Silhouette Studio click here.
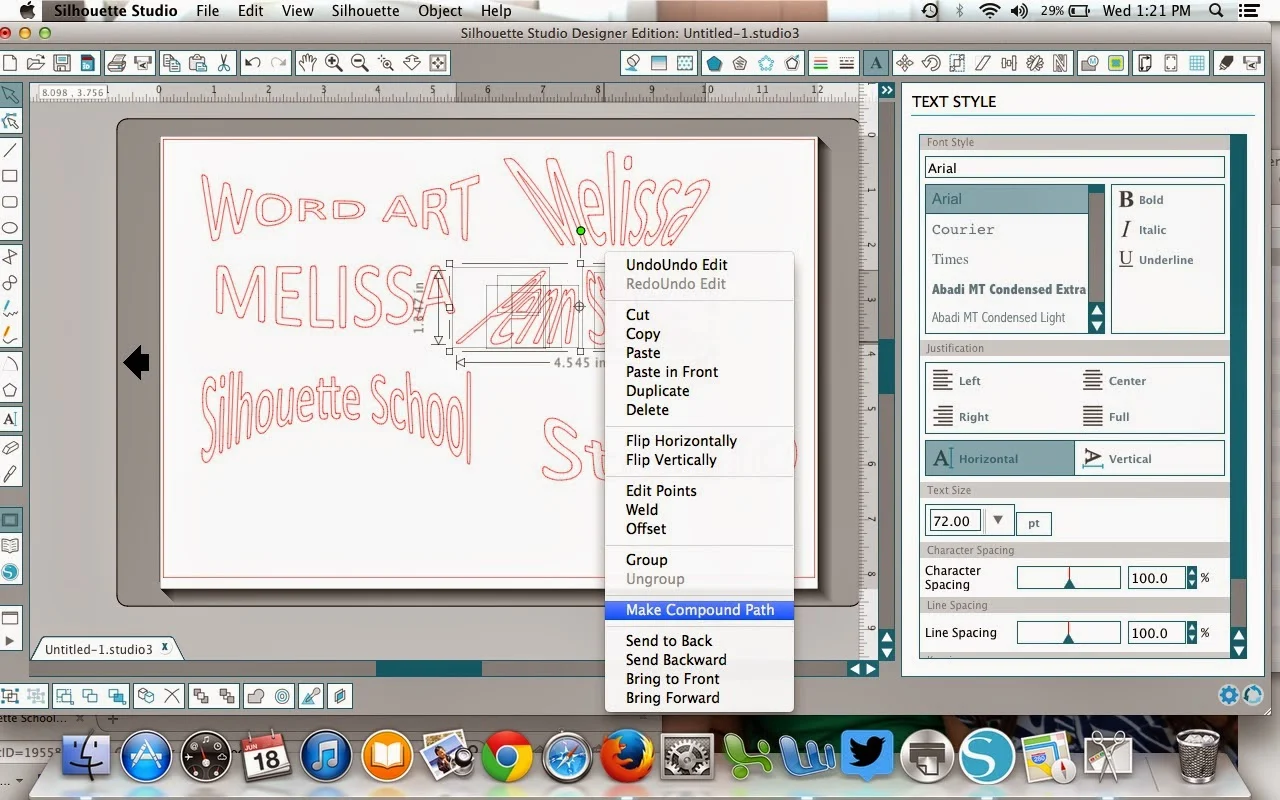
After you resize your ridiculously large image, you should have something that looks like this.
Can you guess where I'm going with this? Yes, you need to use the trace tool. So click on the 'Trace' icon > Select Trace Area > Use your mouse to select all the word art > Uncheck High Pass Filter > Slide threshold bar over to about 80 or so until all you get solid yellow > Trace.
And now, once you move your original Powerpoint slide out of the way (and delete it) you're left with this...
SIDE NOTE: If you have several words, like I do in this example, and you traced it all as one big design, you'll have to separate them by ungrouping. I would suggest you ungroup and then go through each word individually and 'Make Compound Path'. If you don't - all the letter counters (like the middle part of the e, a...) will not be grouped with the letters.
Now you can just cut your word art like you would any other design. Don't forget if you're using world art with HTV, you'll need to flip it.
That's all there is to making word art in Silhouette Studio!
I know some of you may be looking for more complex word art like turning a group of words into a shape...that I am still working on and am hoping to have a tutorial soon.
Note: This post may contain affiliate links. By clicking on them and purchasing products through my links, I received a small commission. That's what helps fund Silhouette School so I can keep buying new Silhouette-related products to show you how to get the most out of your machine!
Thanks for coming to class today at Silhouette School. If you like what you see, I'd love for you to pin it!


.png)


Hi Melissa - There's an app online called Tagxedo that creates "word clouds", and allows you to save a file in a jpg format. I after saving, I was able to import it into Silhouette, trace and it worked perfectly. Once you see Tagxedo's app, you'll so be able to do any words you desire as a shape! Have fun! Blessings!!
ReplyDeleteIts a nice sharing and every students learn this from initial.
ReplyDeletebuy custom essay online
Thanks for such a great article here. I was searching for something like this for quite a long time and at last I’ve found it on your blog. It was definitely interesting for me to I read about free cisco pass4sure dumps and their market situation nowadays. thanks one more time and keep posting such nice ones in the nearest future too.
ReplyDeleteSilhouette Studio is an amazing app for the students. These apps makes student's life more easier.I hope this App in future will work as Assignment Tutor for belongs to Graphic art.
ReplyDeleteGlad I found this tutorial. But for the life of me I can not find the toolbox!! Powerpoint 2010. Any suggetions?
ReplyDeleteIn newer versions it Format - Text Effects - Transform
DeleteI can't find the "toolbox" either. In fact, my version of PowerPoint looks nothing like Melissa's. I am using what comes bundled with Microsoft Office. So I don't know if that makes a difference or not.
ReplyDeleteApparently, nobody is bothering to check the replies to these older tutorials. Really would like to get clarification on it.
ReplyDeleteIn newer versions it's Format - Text Effects - Transform
DeleteThank you for your reply. Do you have any idea of what version started using that?
DeleteThanks for posting this!!! I am still "new" to the silhouette and was wondering how to get the cool word art!
ReplyDeleteThanks for providing such useful information examcollection C5050-284. I really appreciate your professional approach. I am very happy to see this. It is totally useful for me. examcollection C9020-461
ReplyDeleteTape an expansive sheet of dark development paper to a divider, at about set out high toward the subject Essay Camp Kill all lights and cover the windows in your space to make the darkest space conceivable. Cover mirrors and other intelligent surfaces with a bed sheet or other texture. A solitary wellspring of enlightenment is best for an unmistakable shadow with just a single diagram.
ReplyDeleteThanks for sharing
ReplyDeleteArt is one of the beat skill because through this skill, we can make our future secure. Here, you shared a wonderful post with beautiful imagery so that readers can understand it clearly. I had some doubt about art but after reading your post, I have solved my issues.
ReplyDelete